SSH Tunneling creates an encrypted channel from your local Desktop to the remote server (and vice versa). Once the secured channel is established using SSH Tunnel, you can access the applications in the remote server without the need to open the firewall. This is especially helpful when ports are not open from your local Desktop to the remote server that you wish to access. This particularly comes in handy during development phase of your application or during troubleshooting. The only pre-requisite is that you need to have SSH access to that server. There are 3 types of SSH Tunneling: Local Port Forwarding, Remote Port Forwarding and Dynamic Port Forwarding. We will look at Local Port Forwarding in this article which is the most frequently used.

Syntax
Below is the syntax used to create a SSH Tunnel:
ssh -N -L LOCAL_PORT:HOST:HOST_PORT USER_NAME@REMOTE_SERVER-Nrestricts you from inputting any command after the connection is established, this is preferred while using SSH Tunneling-Ltells SSH that it’s local port forwardingLOCAL_PORTThe port we will use locallyHOSTThe host address in the remote server. Usually localhost / 127.0.0.1 to access the application running in remote server.HOST_PORTThe port number of the host address where the application is runningUSER_NAMEUser Name of the remote serverREMOTE_SERVERRemote Server IP Address or hostname
Use Case: Connecting to remote database
If you host your websites in one of the remote VPS servers, you would have stumbled upon the issue of connecting to the database from your local Desktop. I can access the database locally by opening the DB ports in firewall. But, what if I don’t like opening the DB ports ? The solution: SSH Tunneling. We can create a SSH Tunnel from our local Desktop to the VPS server using SSH. Port forward to the remote DB ports, after which we should be able to connect to the database in the remote server as if they are installed locally.
For the purpose of this demo, I have created a new server in digital ocean and have installed mariaDB database in it.
Setup
Local Desktop:
Operating System: macOS Catalina
Database Client: sequel Pro
Remote Server:
Provider: Digital Ocean
Operating System: Fedora 31 (Cloud Edition)
Database Server: mariaDB
Create SSH Tunnel
First we will create the SSH Tunnel by running the below command in terminal:
ssh -N -L 2000:127.0.0.1:3306 demo@161.35.77.93 -i ~/.ssh/id_curioustechnoid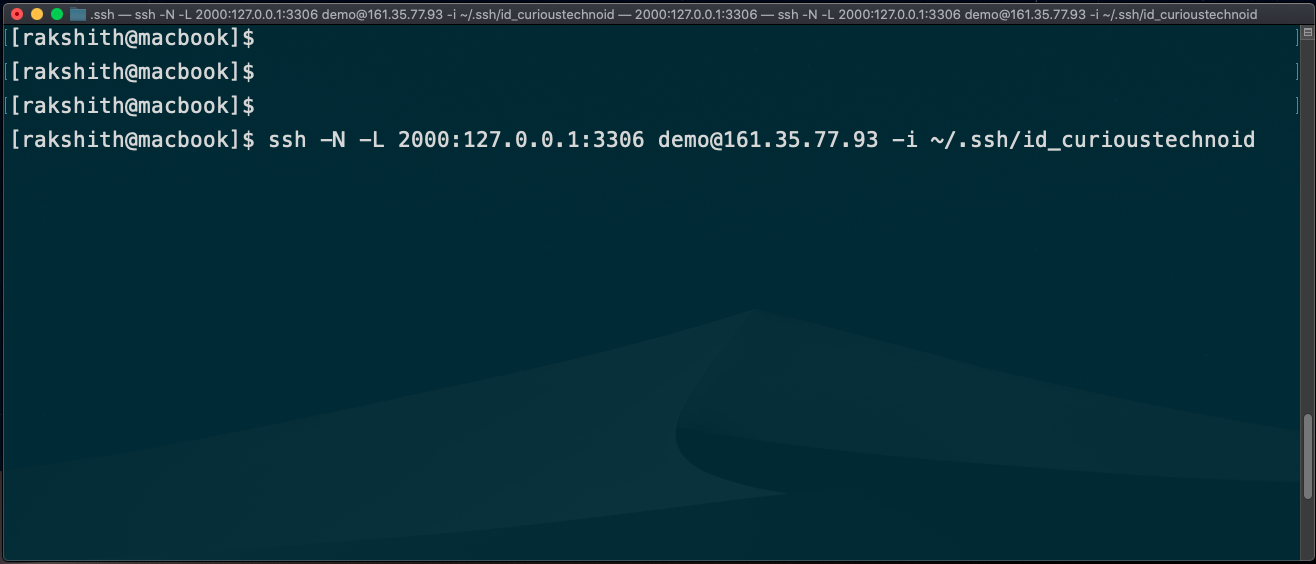
2000is the local port that we will use in the client127.0.0.1is the Remote Server localhost. This is nothing but localhost in the remote server3306is the Remote Server mariaDB Portdemois the Remote SSH User Name.161.35.77.93This is the Remote Server IP Address~/.ssh/id_curioustechnoidis the private SSH Key used to connect to server. Read more about SSH Keys here.
Change the values based on your setup. If all the options are provided correctly we should have an active SSH Tunnel created.
What the above command did is that it created a SSH Tunnel which port forwards any request on port 2000 to the remote server’s port 3306. In our case mariaDB is running in the default port 3306 in the remote server. In the above command, we are using SSH Keys to connect to the server. It’s strongly recommended to use SSH Keys to connect to remote servers instead of username/password. Click here to know more about SSH Keys.
Connect to database
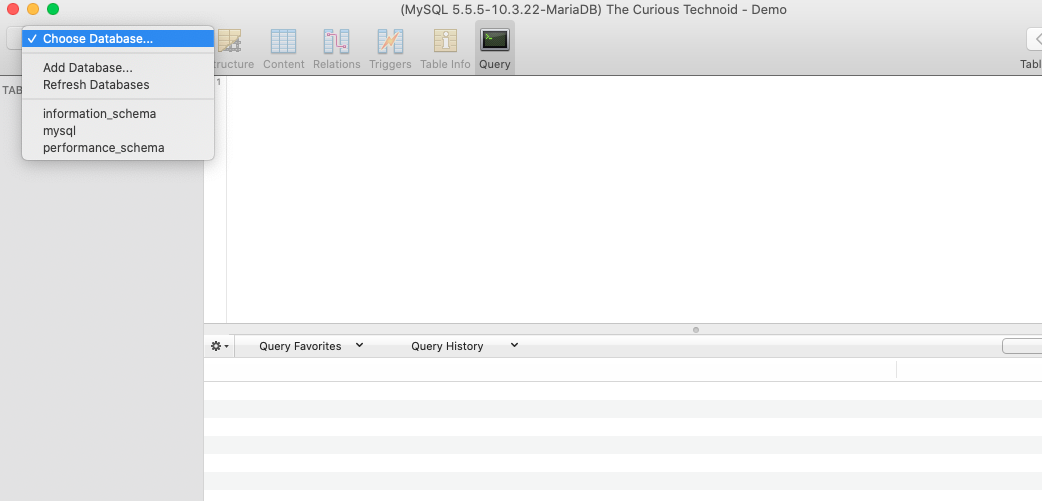
We now have encrypted connection established between local and remote server using the above SSH Tunnel command. Lets try to connect to the database in the remote server.
I will be using sequelPro database client and will connect to root database user. Enter the following details in connection section:
| Host | 127.0.0.1 | localhost |
| Username | root | Database User in the remote server |
| Password | ******* | Database Password in the remote server |
| Database | Database you want to connect to. | |
| Port | 2000 | Local port which while creating the SSH Tunnel |

We have successfully connected to the remote database using SSH Tunneling. You would have noticed that we are using localhost(127.0.0.1) and localport(2000) to connect to the database hosted in remote server. The practical usage of this concept in limitless.
Hope this article helps you in using SSH Tunnels. Please feel free to share your experience or your issues in the comment section below. Happy to help!